a blog discussing politics, stock markets, and calculus.

Tuesday, November 27, 2012

A Little Probiotic Snack

Are you as obsessed with ranch dip as I am? I love the stuff. I have a weakness for potato chips and ranch dip. Sometimes I eat a carrot or two with it so I feel a little better about myself. The other day, I went to make it and realized I had about a spoonful of sour cream left...you can imagine the disappointment.  Instead, I reached for the greek yogurt and my ranch dip has never been the same since! Ithink it has a better, more creamy taste.  I'm not a huge calorie/fat gram counter, so that aspect didn't mean much to me, but I do know that greek yogurt has more grams of protein and has all of those amazing little cultures swimming around. Sounds gross, but probiotics are our friends...meet Lactobacillis Acidophilus, L. Bulgaricus, and Bifidobacterium folks! Your gut, intestines, and immune system will thank you later. With all the anti-biotics floating around in our food, water, and Rx medicine, our natural flora has been decreased and adding the good bacteria back in does wonders for our body. We take a probiotic daily and double up any time our digestive tract is acting funky. I even use it down my sink drain to eat away any stragglers that get stuck in my pipes. It works! 

My advice for beginning a probitic regimen is making sure you get a product that has at least 3 strains of different bacteria and starting with half of what they recommend.  It can take a few days to a week to get used to the new addition of friendly bacterium. 


2 tablespoons = 1 oz. so multiply all the sour cream info by 4 to get the comparables. 


Monday, November 26, 2012

A New Venture

Last week was super busy! It was Thanksgiving (obviously) and I did not get around to many projects.  Cooking turkeys, rolls and cobblers will do that to a person. We had Thanksgiving at our house with some great friends and amazing food. I did start on a rather large project, which I will share in a nice photo collage later. But first, exciting news. You're thinking baby, right?! Nope!

 I will officially start teaching my first yoga class on December 3rd. I can-not wait! I have been contemplating teaching yoga for a long time. I started practicing in college when I took a random yoga class for a random credit I needed. I loved it and haven't stopped since. It helped me through both my pregnancies and is something that makes me more balanced. For me, yoga is a stress reliever and a means to stay in shape. Even though I have been practicing for over 6 years, I am still learning every time I roll out my mat. There are many facets of yoga that I do not understand and may never, but I appreciate the benefits of practicing and recommend trying it to anyone who has not.

I started my teacher training program back in September through YogaFit.  Although it is not my exact style of yoga, it is a means to an end. It is humbling to start from scratch and break everything down as simply as possible. I didn't realize how difficult it would be to articulate poses to a beginner.  This training program is super convenient for me because it is based on levels and completing them on my own time, with no time limit.  With my girls and where we are geographically, a 6-week intensive or even a weekend-based course was not an option. I have been fortunate enough to meet the right yoga instructor here in Alamogordo who has helped me tremendously and set me up with my first class, as well as helped me find some volunteer opportunities so I feel confident and ready for the upcoming class. It feels great to be actively learning again and has already been a rewarding experience to be a part of others' yoga practice.  More on this later!


A little preview of my current project:


Aren't those chairs beautiful? They are all I've ever dreamed of and more...which is why I am going to paint them and reupholster them. Now, this will be my first go at reupholstering anything so I plan on taking my sweet time. The table, unfortunately is much smaller than I thought when I bought it. It is a tad small for the area it will go in, but we will make it work until I find a table I love and want to splurge on. The set was $35 at a local thrift store, so I didn't waste thousands of dollars on something I am not planning on keeping forever.

Sunday, November 18, 2012

Three Days Worth of Projects!

You thought I gave up? No sir...I'm going alllll the way. I decided to throw all of these projects into one post because they are semi-related. Well, the first two at least. The second just took me an extra day.

Like I said in the previous post, I wanted to add some shelves next to Nigel, behind the TV. I decided on one shelf for now and may add another at some point. I like the one for now. I had gone up to The Old Apple Barn on the way to Cloudcroft with a friend a few weeks back and saw some awesome iron work and I was inspired to build a shelf. This place is filled with trinkets and cool gift ideas. The first time I went the most anal man of all time followed me and my friend around, making sure Piper and her daughter were not "ruining the merchandise," as he so delicately put it. They were literally carrying around stuffed dogs, being absolute angels...it could have been much worse. There are isles and isles of toys and tiny objects to destroy, but they displayed extreme self-control...beat it mean old man. I ventured up there the other day to purchase my iron L-brackets for the shelves -- here is a glimpse of the selection...

not sure why willow is trying to undress? 
So granted there are extremely cheesy horseshoes, gun-shapes, frogs, bear claws, etc...there are some diamonds in the rough up there. Remember, we are smack dab in the middle of retirement-ville. This place is a little pricey, but I really wanted a certain look and I had a birthday gift card burning a hole in my wallet. I knew the rest of the shelf would be free, so I felt OK spending $18 a pop on the L-brackets. The previous owners of our hose took on some weird, epic project in the back of our property and clearly never finished. They left tons of wood just laying around. Unfortunately it has all succumbed to the weather, but it gives me some awesomely distressed wood to use at my disposal.


Day 11 DIY shelf:
Step 1. Chose your wood. I used a 1x4x12 that i found in the back yard. You could buy a new one, they are about $6. I cut each piece at 3 feet, to make the shelf more deep. You could use any size piece of wood, depending on how deep you want it and also the size of your L-brackets. 
Step 2. Paint or stain. After it dried, I used some adhesive to make sure it was sturdy.
Step 3. Line up and screw on L-brackets.
Step 4. Level and screw into wall! Hopefully you have a nice husband like mine, and he helds you with Step 3 and 4! 

This project was a little more expensive that I would have liked, but some others have been free. I had the wood and the paint and the brackets were $18/piece. In total it was $36. I'm sure you could buy a shelf for less, but this one is custom. 


My next project is the vase in the final picture of the shelf. I needed something to put up there and all I had left was boring glass flower vases. I grabbed some paint tape and a can of spray paint and experimented. 

Day 12 DIY Striped Vase:
Step 1. Use an old flower vase or grab one at the local thrift store. (i see them there all the time for $2 or less).
Step 2. Tape off the pattern you want, I chose thick stripes. Make sure you really press the tape against the vase, I got some leaking.
Step 3. Spray paint...ideally not in the dark, like I did. Let dry.
Step 4. Remove tape and viola! a new vase. 

This was free! I already had the vase and paint. If you wanted to try it, you could probably do it for $5 or less. 


This next project isn't really related. I just finished it today, so it counts as my project for Day 13. I got the idea from my sister who made one a while back. I love the idea of growth charts, but some of them are just so stinking cheesy. I also don't want to start charting the girls' growth on a door frame, as I know this is not our permanent residence. Enter awesome pottery-barn inspired life-size ruler growth chart!

Day 13 DIY Growth Chart:
Step 1. Use a large board, I used a 1x6x6.
Step 2. Stain or paint your color of choice.
Step 3. Have a really nice sister who used her cricket to cut-out the numbers and hash-marks OR follow THIS
Step 4. Measure out your feet (1-6) first, then 6 inch marks, then 3' and 9'. Remember to measure the first foot from where you will be hanging it on the wall, IF you want to actually measure your kids accurately.  If it is just for looks, it doesn't matter. 
Step 5. Apply your numbers or draw them.
Step 6. Add a coat of polyurethane after 24 hours.
and there ya go!

The board was $6 at Lowes, I had the stain and poly from a previous project and my lovely sister made the cut outs for me! SO 6 BUCKS. Shwing. Now to begin charting the girls! What a fun and easy way! You can carry this from house to house. Now hopefully they don't grow over 6 feet...


Thursday, November 15, 2012

I'm a skipper: Day 10

GASP. I didn't do a project yesterday. I have some exciting things going on right now and I got busy yesterday and din't get around to an actual project. I did however prepare for today's projects! I ran by a thrift store while I was out and found 4 large frames for 10 bucks. Woot! So, without further ado, another super simple project for Day 10.

I was looking around the big room and decided we desperately need things on the wall. I have no idea what I want to do with the big wall next to the fireplace, I might even splurge on something super cool, if I ever find it. That will probably mean leaving Alamogordo, which I find I rarely do. Strange. We already have our friend Nigel up behind the TV. Ian shot Nigel back in high school and his Dad brought it to us when his parents visited this summer. Nigel is an Antelope. I wanted to showcase Nigel a little more and I thought a frame would be perfect! I originally wanted to paint a square a different color that the wall behind the beast, then frame it...but I'm taking baby steps here. I may or may not paint it. I also need some decor for the connecting wall. I have plans to make two shelves and find some awesome hardware to hang them with at The Old Apple Barn up on the way to Cloudcroft. They have some seriously amazing iron work there. Anyways, I was scrummaging through some boxes and found one of Ian's targets from weapon's school. What better thing to display next to a dead animal, right? The steps and final product are below.

Step 1: find some frames. thrift them, re-use them, make them!
Step 2: sand (if they were painted/stained prior) and prime said frames, let dry.
Step 3: sand primer until smooth.
Step 4: paint frames. BOOM. done.

How much did this little project cost me, you ask? Each frame was $2.50, I had the primer and the paint tester, but for all intents and purposes, the paint was $3. SO...grand total is $8. Thankyouverymuch.


 Nigel now has a home...inside his very own frame.
please disregard the unfinished trim in these photos...do you expect anything less from me? it will get done eventually.

After I painted the frame, I tacked Ian's target poster on the back. And this will go up on the shelf behind the TV, once I make them of course :)


Tuesday, November 13, 2012

Day 8

I chose something super easy for today since we had a relatively busy weekend. By relatively, I mean we actually left the house. Ian is a total home body and I could be going 100 MPH at all times. We meet in the middle and do things here and there are on the weekend. He complains every time and then always has fun. I used to throw a fit and get mad trying to drag him out of the house. Now I just gently persuade and wait for his annoyance to wear off and we end up having a great time. I've also learned not to plan too many things in a row...I have to take what I can get! On the other hand, he has taught me to just relax and that doing nothing sometimes is doing something. It gives us all (the girls included) a chance to slow down and decompress. On that note...here is my super easy decorative "basket" project!

Step 1. find an old cardboard box to fit the space you need. I used a shoe box, but any 'ole box will do! I cut the top off and decided not to use it.
Step 2. find some fabric: buy it, re-use it, use a pillow case, a baby blanket, some old curtains, your husband's underwear! whatever!
Step 3. grab a glue gun. I'm sure super glue or even Elmers would work here!
Step 4. wrap your box! I wrapped it like a present to give it some "flare" on the sides. You could trim the sides to wrap it any way you want!

Now, I'm sure I saw this on one of the many DIY/crafter blogs and websites I peruse, but I don't know which one. I didn't come up with this, but I'm sure many people have shared it before. This project has the potential for being FREE! I don't have a sewing machine, so I don't keep a lot of fabric around. I did happen to buy this yard the other day, because it was on sale in the scrap basket. So for me, this project was $2.50! Woo to the Hoo. Way better than paying upwards of $10/basket! And it's an excuse to buy those new shoes you've been eyeing for the last 2 weeks. You can "upcycle" the box. Upcycling is ALL the rage.


and VIOLA!


Monday, November 12, 2012

Day 6 & 7

These projects are short and sweet!

Day 6:
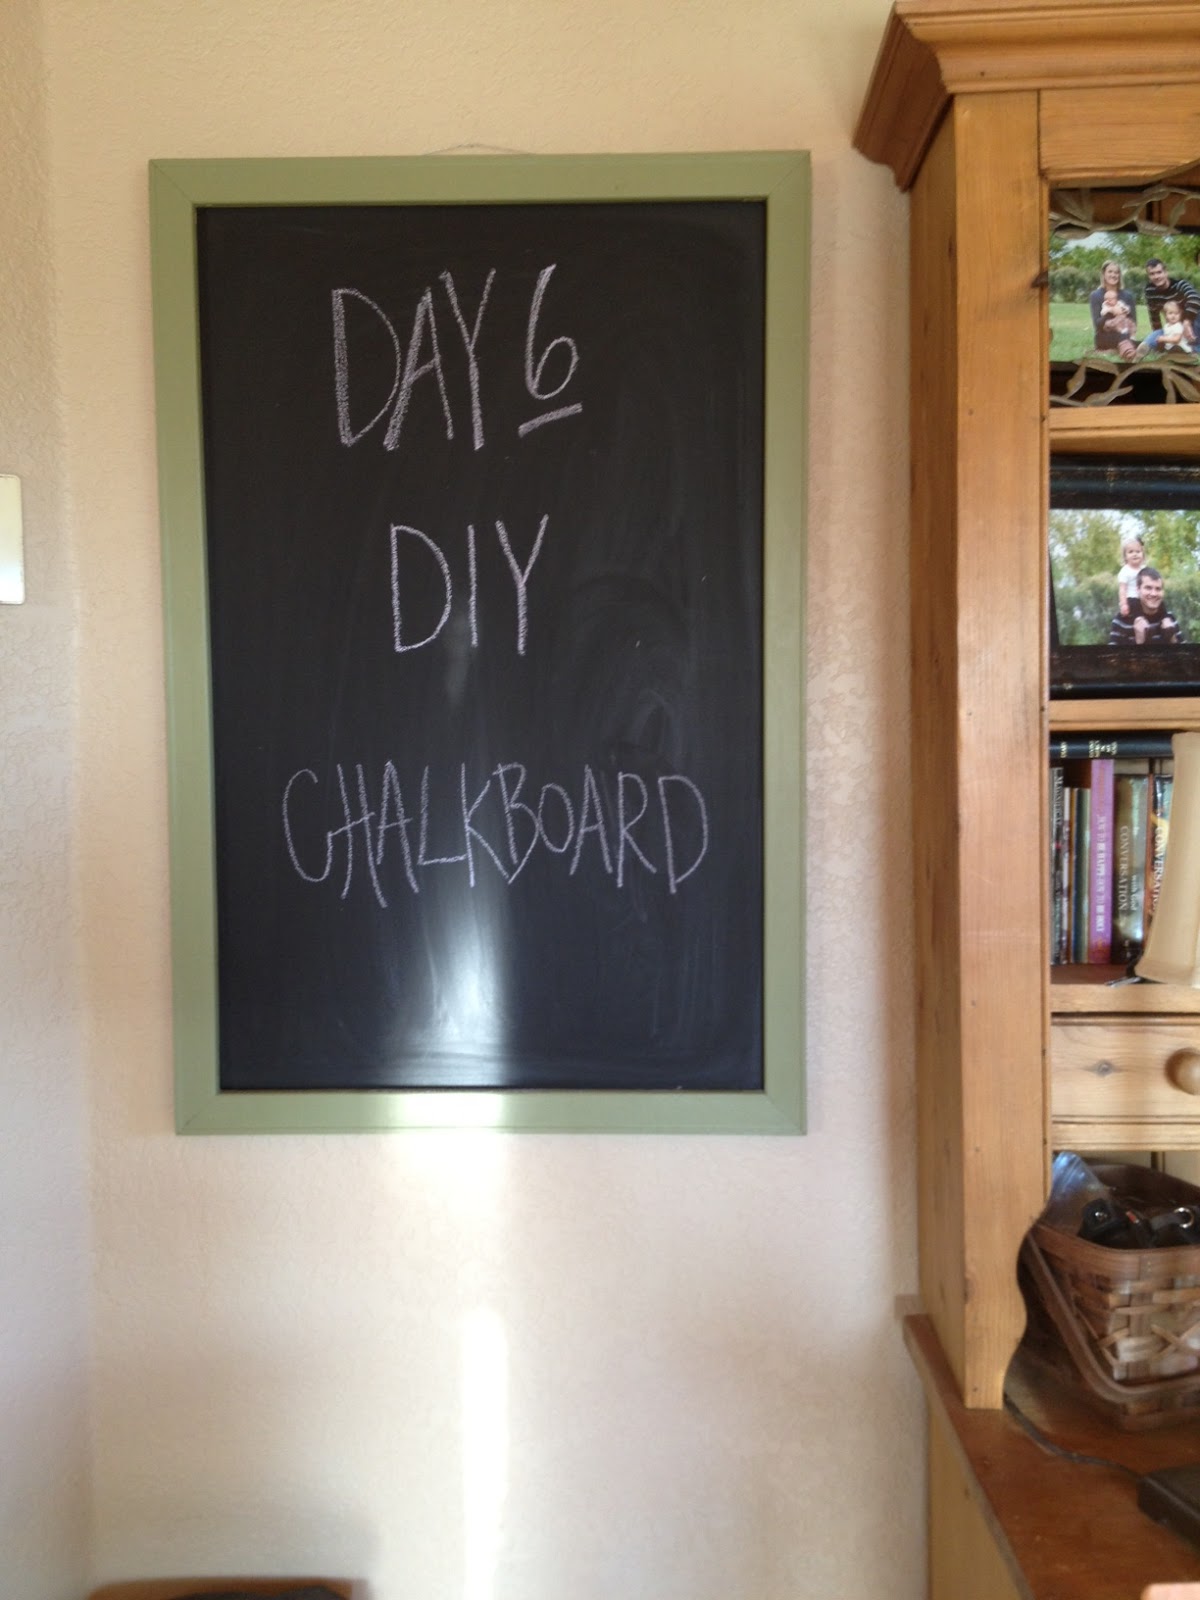
Yesterday I made a chalkboard for the kitchen. It is super easy and I'm not sure why it took me this long to make one! I found large empty frame at a thrift store for $2.50, primed and painted it, cut some super thin plywood to fit, primed that sucker, then rolled the chalkboard paint on. I tacked the plywood on the back of the frame with some small nails, and boom -- a new chalkboard! I put it up in the kitchen so I can use it as a calendar or menu or whatever! Like I said before, the frame was $2.50, the chalkboard paint was $14, and I already had the green paint. All in all, $16.50, BUT I have a ton of chalkboard paint left-over...so I foresee many more chalkboards in my future...


Day 7:
Since we got the big room painted, I can finally put some stuff up on the walls! I decided to use some super simple picture frames I have to make a photo wall. I'm a sucker for linear design. I updated some pictures and busted out my level to make sure I did an A+ job on this! The absolute best part about this...it was FREE, today at least. I've had the frames for a while, but if my memory serves me correctly, they were about $2 or 3-something a piece from Walmart. They are actually diploma displays! Sorry for the glare, I tried shutting every blind, but I still got some glare. I'm also going to add another row or two on top, hopefully wally-world still carries these!

PS to family: send me an updated family pic, please!!


Saturday, November 10, 2012

Day 4 & 5

I did do a project yesterday...but after having a play-date in the morning, having lunch with a friend, cleaning up the house I've been ignoring for the last couple of days, and then making dinner and having wine...I fell asleep on the couch super early -- like a champ. Needless to say, I didn't write a post, but I did do something!

I found a couple of old 2x4s laying around the yard somewhere and thought they could make a cool sign of some sort. I washed them off and tacked them together on the back with some scrap wood and nails, luckily they were basically the same length. I grabbed some paint testers we have and decided on a light blue. I left some wood showing so it looked a little distressed. I tried to Pinterest some ideas for a phrase or something witty to put on it. You can see the outcome in the photo...honest people...is this cool or dumb. I need perspective! I'm still deciding where to put it...if anywhere! When it is up above the cabinets from some perspectives it look like it says, "FAT --->" HA!


For today's project, we painted the family room. It has had about 6 different paint colors slapped up on it for about 6 months. It was time. We struggled to decide what color to put up, obviously. At first we wanted something different than the rest of the house, maybe a green or blue or gray. Well, we couldn't find anything we liked...not even close. The fireplace is a presence and it was hard to find a color that went well. Today, when I couldn't handle the paint splotches all over the room, I ran by Lowes after yoga and came home with some paint...some tan paint. It looks good and now I can start to actually do something with that room! We did want to paint an accent wall across from the family room, the wall that goes upstairs, but it turned tan too! Ian did it. Maybe some day when we find a color we love we can repaint. It went pretty fast with Ian's amazing rolling skills. I just followed along and did the trim. It was actually a nice Saturday project together. He started the afternoon by blasting a playlist that included Lionel Ritchie, Metallica, Phil Collins, and Skrillex? Whatever makes the paint stick to the wall! Nothing too exciting going on it that room...YET. At least the walls are done! In total, I spent $27 on paint for the family room. All other supplies/paint I recycled from other projects. Not to shabby. And I have an easy, inexpensive project to share for tomorrow!

before


during. 


Thursday, November 8, 2012

Day 3

Bookshelf continued...

I sanded that baby down allllllllllllll morning. This is character building for me. I usually would have set it aside, annoyed that I messed up the first time or gotten impatient and painted over my screwy paint job. I am starting one project and finishing it, the right way! Sometimes these projects we take on can be discouraging; they don't always turn out exactly how he imagined them in our minds. I read DIY blogs for fun and inspiration and sometimes I'll see these ladies say,

"I found this super ugly dresser at a thrift store for $3. I cut off one side, whipped up a new top with left over wood from my totem poll project, widdled new legs, miter sawed intricate molding  grabbed my blowtorch and custom-made new hardware from the iron I have laying around in my upstairs closet, and sanded and applied 6 layers of paint and glaze...and look what I made...a brand new sun-room addition!"

Like, huh? Some of these DIY-ers are intense! I'm just learning and hoping to someday be able to tackle almost any home project that we want to accomplish. Thankfully the girls were entertaining themselves by destroying anything in their path. I found Willow by following the items littered in her wake. She was in the backyard, wet and carrying the dogs' water bowl. I found Piper on the side of the house playing in the dirt, with her face and hands absolutely filthy. Whatever keeps them entertained! I would say finding the time to really dig in to big projects is my biggest obstacle at this point.

I grabbed new paint last night for the bookshelf; this time I got a different brand, a slightly lighter purple, and satin finish. It turned out so much better. I first have to start off by saying I went WAY out of my comfort zone with purple. I usually tend toward neutral tones, and if I'm feeling crazy, I go for a green or blue...sometimes yellow.  For a little girls room, I thought I can go a little brighter in here. I like the color, but I don't love it. I also wanted to put a back on it so it looked more finished. I found an unused pillow case, wrapped it tight around some super thin particle board, and tacked it right on the back of the shelf. All in all I spent $5 on the shelf and $10 on the paint (since I messed up the first time around I can to buy 2 new cans).

Here is Piper's new reading nook! She couldn't wait to check it out!


Wednesday, November 7, 2012

Day 2

Epic Fail. I found a little microwave cart at a thrift store for $5 and thought it would work perfectly for a nightstand/bookshelf in Piper's room. It's the gross 90's laminate and it had plastic wheels on the bottom. I figured with a quick paint job and a fun-patterned back, it would be super cute. I have scored a couple of bed frames from thrift stores and need to repaint those as well. Eventually, when Willow is ready for a big girl bed, the girls will share a room. I want to paint their beds white, so I can change other decor around easily if I want. I have a couple of bright accents in her room now, and I wanted a pop of color, so I let her pick between turquoise and purple...she picked purple.

Well, enter using the wrong primer and trying to spray paint anyways...and you get the worst attempt at a paint job in the world. It also isn't quite the purple I was imagining...and I accidentally got glossy. I'm more of a satin finish fan.  Now I'm sharing this with you because we all mess up projects and get discouraged...but I am determined to finish what I start! So, for some comedic relief, I will leave you with the picture of the ugliest attempt at painting a shelf in the history of man-kind. I'll sand it down and try again tomorrow!

I forgot to take a picture before I started priming and I had already taken the wheels off.

dripping, peeling, ugly purple hot-mess.


Tuesday, November 6, 2012

30 Days of Projects

I suddenly have an itch to do some creative business. I think I'm just sick of having ideas and not doing anything about it. Plus, I find myself staring at a screen way too often (whether it is the TV or my phone). So, I'm going to challenge myself with 30 days of projects. Now, is it plausible to actually do 30 projects, one each day? Not with my destructors -- i mean my kids -- running amuck. I'm attempting to spend nap time doing some sort of project. Whether it's painting a wall, refinishing a bookshelf  making a wall sign, sewing a pillow (I wish! I NEED a sewing machine), or any other thing I see on pinterest or I make up in my head. I was inspired by finally finishing the upstairs bathroom. Well, almost finished (typical Aimee style). I still need to stain the lower part of the vanity...I just hate sanding. With a passion. Anyone want to come sand for me? I pay in Halloween candy!

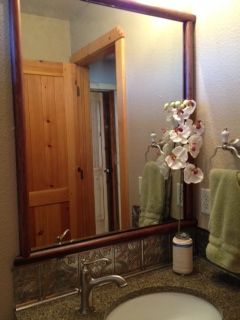
I'm also going to try to do these projects on the cheap! I wanted a backsplash for the bathroom, since we ripped out the tile that was there when we put new countertops on, and accidentally ripped off the drywall along with it. OOPS. I found this tin looking stuff at Lowes, and thought, this would be perfect! I needed something I wouldn't have to grout on and was big enough to cover up the gaping holes from our shotty tile removal. Now, is this the correct way to fix this? No. But, I wasn't in the mood to re-drywall anything ..so for now, I jimmied it. Anyways, I found the Fasade brand sheets and cut them to fit. They also sell moulding for the top and bottom to make it look more finished. After I put that up, I decided it wasn't quite enough. I grabbed some recycled moulding from the garage (it used to be the edging of our old countertops in the kitchen/bathroom), cut them to fit, sanded them down, and stained them from a can of dark cherry stain I had from a previous project. Boom, framed mirror. Now all I need to do is sand/stain the vanity...which I plan to do this weekend! How much did I spend on this lovely project...$32 on the backsplash and adhesive. A little pricier than I would like for one project...my goal for the remainder of this challenge is $10/day (since some projects will take longer than one day to complete and some may be free!). Stay tuned for each project!

Day One: Bathroom backsplash/ framed mirror